My Mom is my everything. My best friend, my sounding board, my ride or die. The one who gives me tough love when I need it and tells me to be gentle with myself when the days are hard. We’ve always been close, but it was only once we no longer lived in the same house that I began to appreciate the things that once annoyed me. The way she always put me first, how fiercely protective she can be, and even the amount of discipline she instilled in the way she raised me.
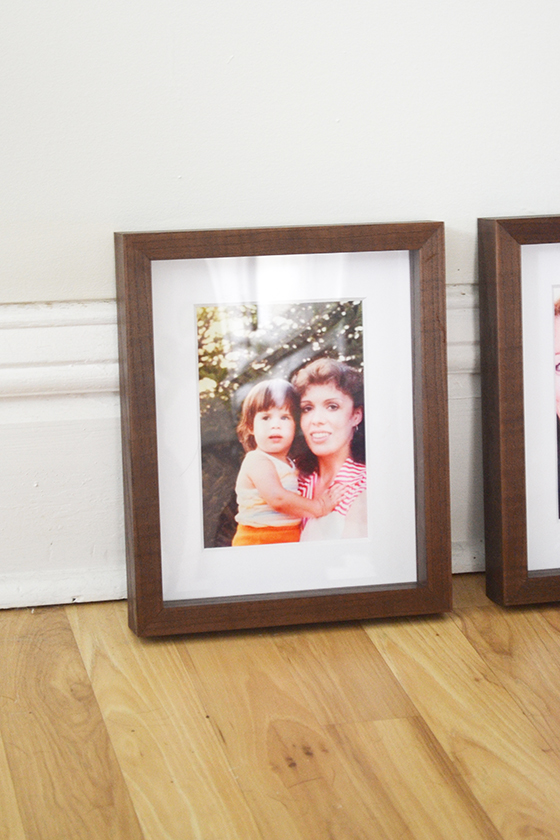
1981
My mom was made to be a mother, my mother. She had me at a young 22 years old, but was wise beyond her years after some difficult family circumstances early on in life. But once she gave birth she never really looked back – we went everywhere together, did everything, and were sidekicks. We still are.
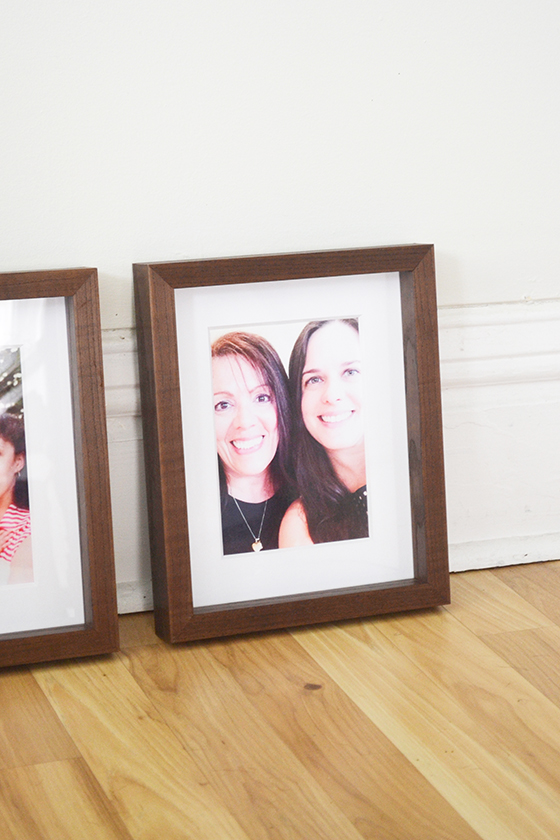
2015
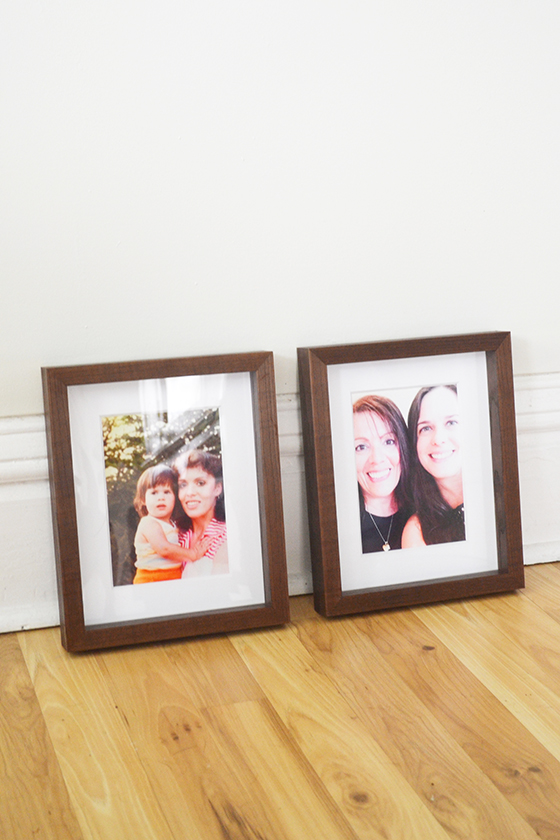
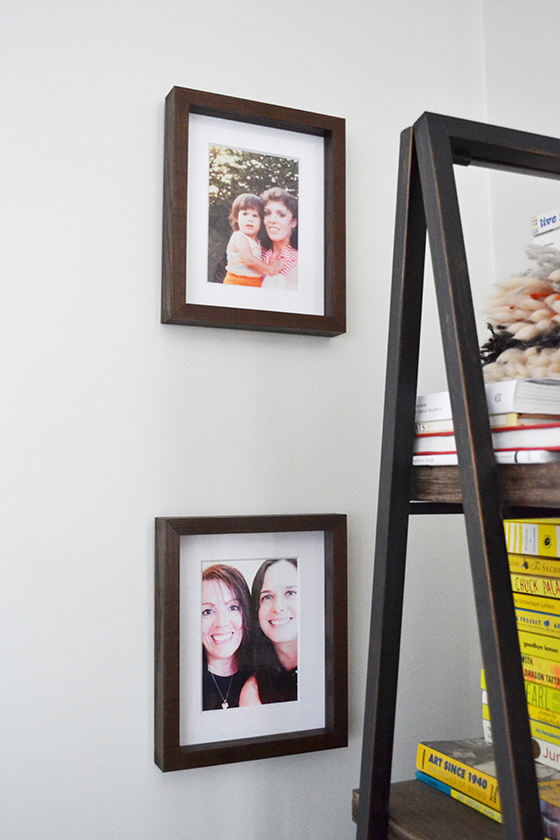
I wanted to give her something extra special this Mother’s Day, something that represents how we began and how far we’ve come as mother and daughter as well as friends. I chose two of Artifact Uprising‘s Instagram Friendly frames, each of them measures 8 x 10″ and is deep set with a gorgeous walnut finish. In the first she’s holding a one and half year old me in her arms at my cousin’s baptism, and in the second we’re crouching in together at Mother’s Day brunch two years ago.
Both of these photos were already in my Instagram feed, so I only had to connect the channel and voila – no uploading necessary. I know these two museum quality frames will be something my Mom cherishes for years to come, and I love that we can add to them in the future with more shots of the two of us!
This post sponsored by Artifact Uprising. All words and opinions are my own, as always. Thank you for supporting the brands that help keep Design Crush creating fresh content! Enjoy 10% off your order through May 9th with code AUxMOTHERDAY17.
While I’ve shared plenty on the updates of the interior of my old, partially-flipped house, there hasn’t been nearly as much done on the exterior. Why? Simply put it’s more intimidating. But back in January I vowed that this is the year that things would get done, and I’ve started off by partnering with Mid-America to replace and add shutters to the front of my home. Mid-America is a leading manufacturer of siding accessories, and they also offer the largest selection of exterior home products in the industry, so I knew both me and my house were in the right hands.
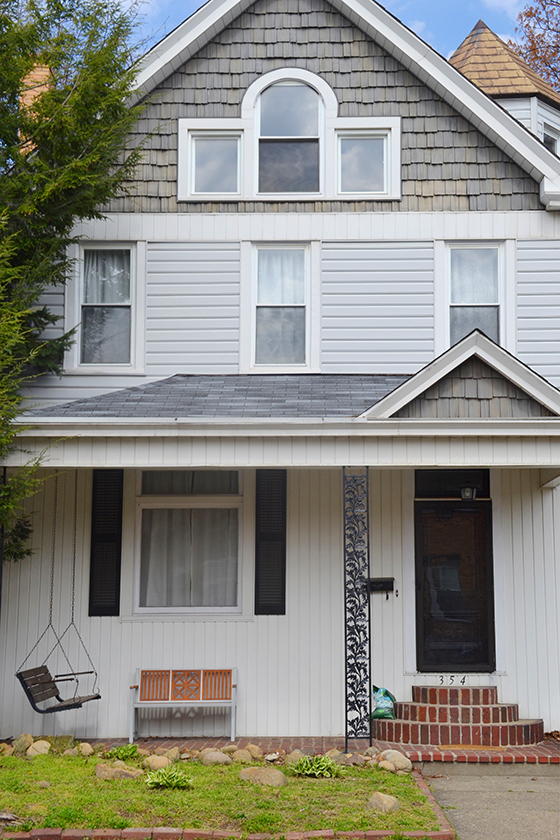
Prior to now only one window had shutters of any kind, the large one on the first floor, front and center and a little to the left. They were wooden, measured incorrectly, and too short. The attic windows looked fine as they’re a more interesting design and flanked by shaker wood siding, but the trio on the second floor just looked… sad.
But no longer! From the street it looks like my house got a facelift. The good kind.
Every window was measured correctly this go around and the shutters installed like a dream with just a drill, screwdriver, and hammer. Mid-America offers a wide range of shutter styles and colors, all low maintenance with no painting required. They’re impervious to moisture and insects, which is something I highly value as the owner of a house that’s 117 years old, and made right here in the United States. I chose their straight top all louver shutter in black for all four windows and couldn’t be happier with the quality or end result.
On the list for 2017:
• landscape the small front yard, dispose of one hundred river rocks
• replace the porch light fixture with something more modern
• strip and paint back deck
• sand and repaint porch swing
Longterm plans:
• build wooden porch up to door height, railing, stairs
• have slate roof repaired
• landscape backyard
• replace porch roof support columns with a sleeker design
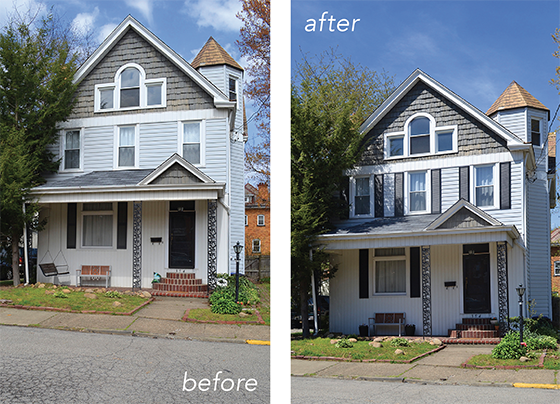
Get a load of the full-on before and after! Looking back the house seemed so incomplete without Mid-America’s shutters. Eventually I’d love to add sets to the windows on the back and east-facing sides for the full effect, but until then I can’t help but smile each time I pull into my driveway. Onto the next project!
This post sponsored by Mid-America. All words and opinions are my own, as always. Thank you for supporting the brands that help keep Design Crush creating fresh content!
Just like clockwork, I filed for my yearly tax extension yesterday.
See, I have a bit of an admission to make which is that I really hate numbers and money or any combination of the two. Design Crush has been a business for nearly ten years and an LLC for more than half of that, and I’m honestly just getting a hold on my books now. It’s always felt extremely overwhelming to me, and so I’ve never made the time to fully understand and grasp what was going on behind the scenes. Money in the bank? Great. Set aside enough of that payment for taxes? Done. And that’s basically the extent of what my plan has been until this year.
Accounting got to the point of being a constant source of stress, a point of mental wellness that needed addressing. So I reached out to FreshBooks after sitting in on one of their workshops, they made accounting seem both easy to tackle and far less overwhelming than it had up until this point.
I’ve teamed up with FreshBooks to bring you the story of my journey this year as I tackle the financial side of Design Crush – and what better time to start than Tax Day?
Let’s start from the beginning.
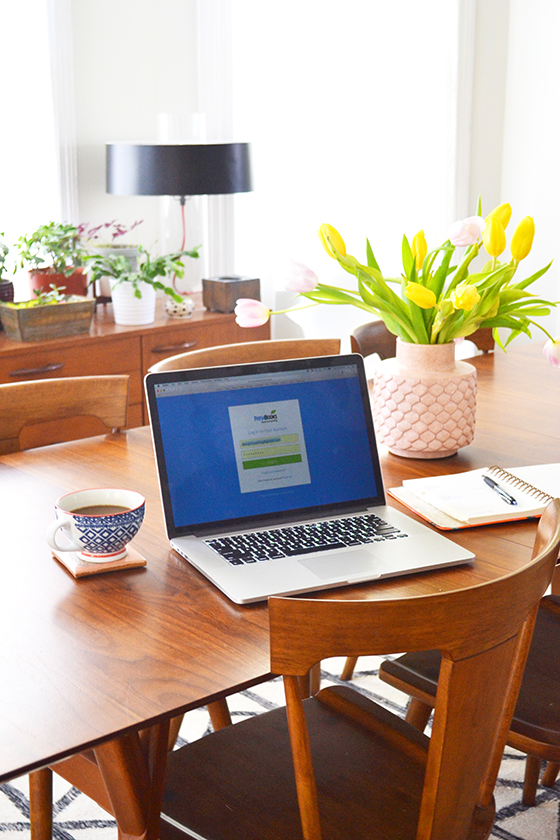
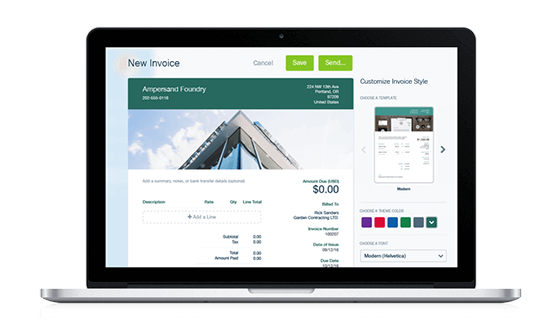
When I first logged into my free one month trial I was immediately impressed by the clean layout. One thing that’s always kept me away from other accounting software is the sheer amount of information being thrown my way visually. FreshBooks was actually designed to be simple to use for the self-employed and easy to navigate, and that’s actually what it is. It became apparent – quickly – that I was about to be far more streamlined as a business as soon as I familiarized myself with the system. (On average users save 16 hours per month!)
I played around backlogging invoices from January 2017 to the present, marking the paid ones off and entering the information of the brands I work with most often for future billing. FreshBooks helps you to create a professional looking invoice that includes your logo, as well as sends out reminders when one goes overdue – basically taking you out of the role as the bad guy. (I love this.) You can even personalize a thank you message that goes out once each invoice is paid. Now this feature is like magic to me, you can set up your account up to accept credit cards! *mind explodes* If you’d like to dig even deeper you can add additional charges for late payments and request deposits from clients. Everything can be automated, making invoicing as painless as humanly possible.
Invoicing features: customization, payment reminders, automatic late fees, accept credit cards, recurring invoices, flexible due dates, handle received invoices, discounts, deposit requests, preview before sending, multi-currency billing, multi-language invoices, duplicate invoices, automatic tax calculations
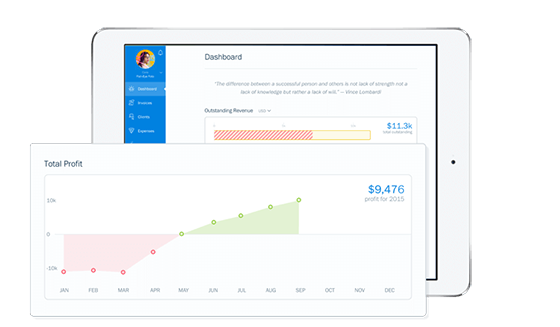
Next thing, I photographed receipts and uploaded them to mark as expenses. Being a visually-driven person, it really helps that I’m able to see both the actual receipt as well as the file in FreshBooks. Nearly all of the functions include a line graph spelling things out for those of us who comprehend information better in that form. In this case I can tell immediately how much I’ve been spending and how profitable Design Crush is at any moment. Goodbye shoebox of receipts and manual entry! My accountant is already thanking you because he won’t be receiving a handwritten list for my 2016 taxes. *cringe*
So, this is the start of my journey. I’m looking forward to sharing more of what I learn along the way as I step out of my comfort zone and tackle this neglected area of Design Crush. If you have any questions about FreshBooks I’d love to try and help get answers for you from their award-winning rockstars in customer service. In the meantime, you can sign up for a free monthlong trial right here!
This post sponsored by FreshBooks. All words and opinions are my own, as always. Thank you for supporting the brands that help keep Design Crush creating fresh content!
It’s been awhile since we last shared a tips + tricks column, so today I thought I’d share a little about what I’m always reading up on – running a creative business. You don’t have to be a blogger to benefit from this list of advice, honestly you don’t even have to work in a creative field. I’m forever searching for a work/life balance, trying to figure out my next step should be in this ever-evolving field, and how to make the most of the 24 given hours in each day. (And about 100 other things.) Drop any go-to advice of your own in the comments!
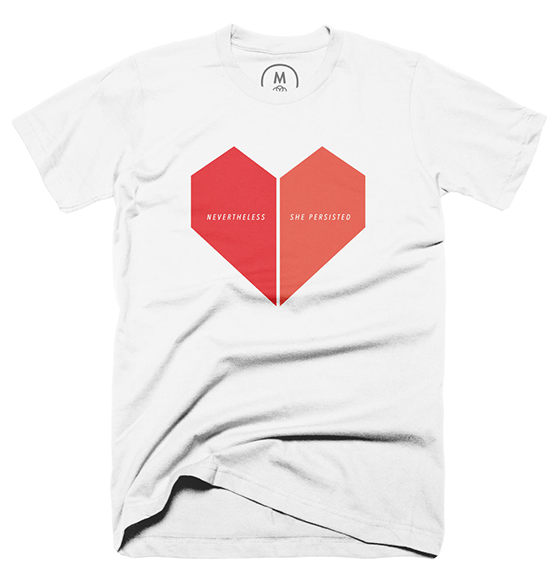
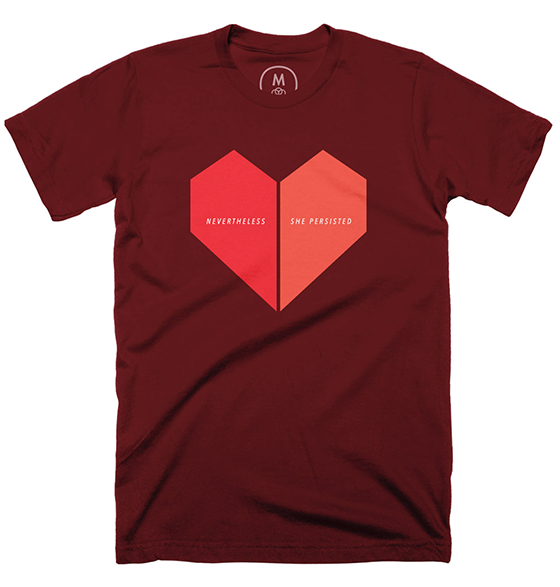
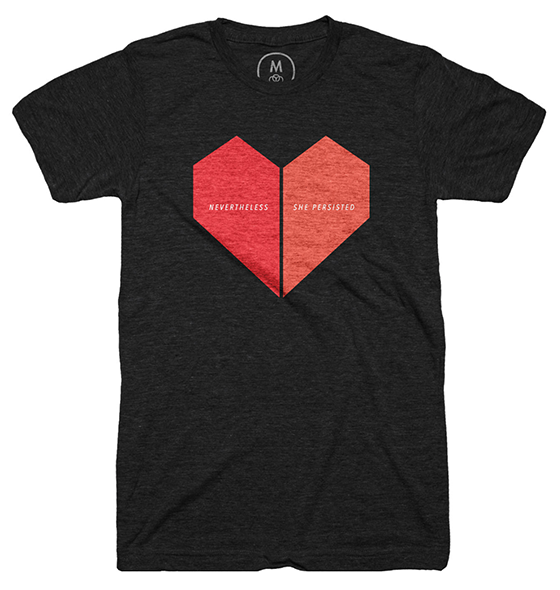
LET’S TAKE THIS ONE STEP FURTHER. After our hugely successful post full of printable #resistance postcards some of you reached out about the possibility of selling my design as a t-shirt. My gears immediately started turning, because why hadn’t I thought of that??
I submitted my design to Cotton Bureau (a favorite business right here in Pittsburgh) and as of today you have two weeks to purchase it on their site! The shirt is being offered in white, maroon, and vintage black in both men’s and women’s sizes for you to rock on your hot little bods. (Note: None of the shirts are pre-washed, but should only shrink *maybe* half an inch if washed in cold water.)
Half of all proceeds are headed straight to the ACLU! So buy it, wear it, and stand up for what you believe in.
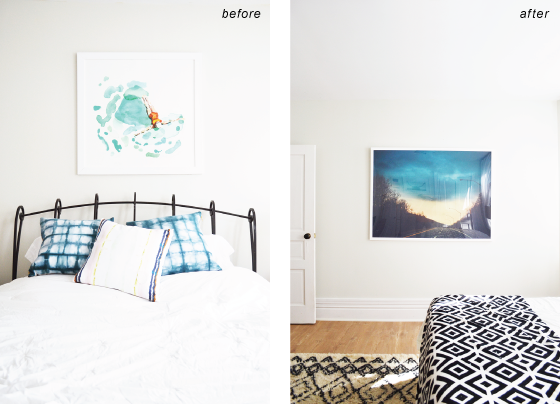
How happy am I with the makeover Quick•Step flooring and I worked on? So happy that I basically never want to leave my bedroom. I’ve never been a morning person and I now find myself waking up with a smile on my face. It’s utterly ridiculous and I’m completely head over heels for what I feel like is the first bedroom design that truly matches my aesthetic.
Here I’m spilling about how I pulled it off and the items I picked up to give the room a great refresh, and over on Quick•Step Style I’m sharing more about which flooring I chose for the RoomUP Challenge, as well as five tips for making your space feel bigger (trust me, they’re really good ones). Head over there then meet me back here… I’ll wait…
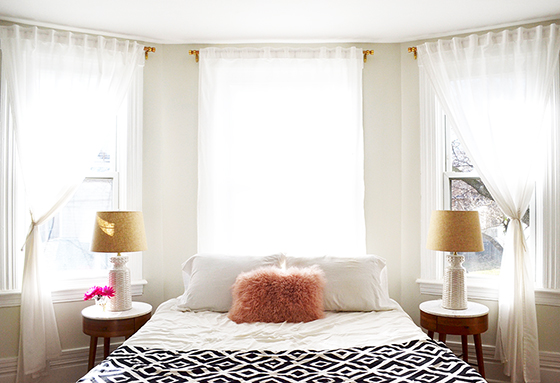
Okay, let’s start with those lamps. (Oh, if you need a refresh of what the master bedroom looked like before, here you go.) I loved the old lamps hard, but it was time for a change that blended more seamlessly with the rest of the room. This pair of Helene white ceramic table lamps* match the boho chic vibe I was going for. Their basketweave-patterned bases and linen shades add a nice touch of texture and the size isn’t too overwhelming for the Penelope nightstands.
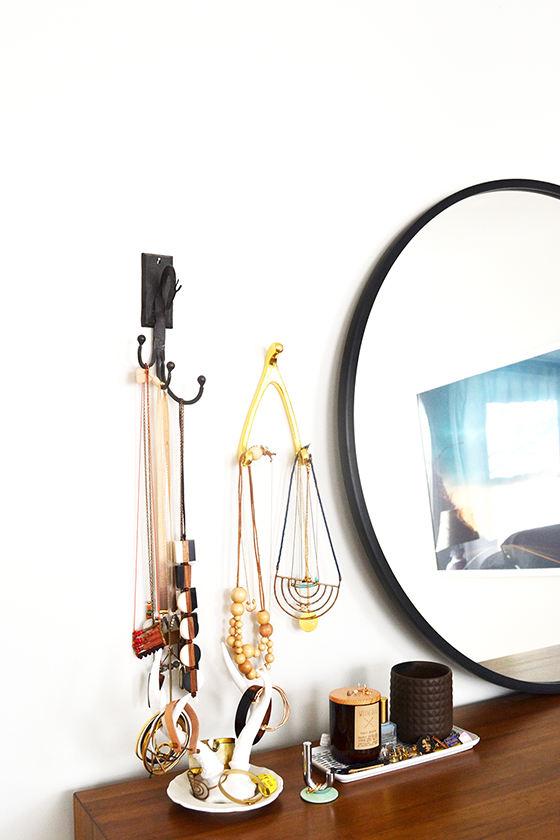
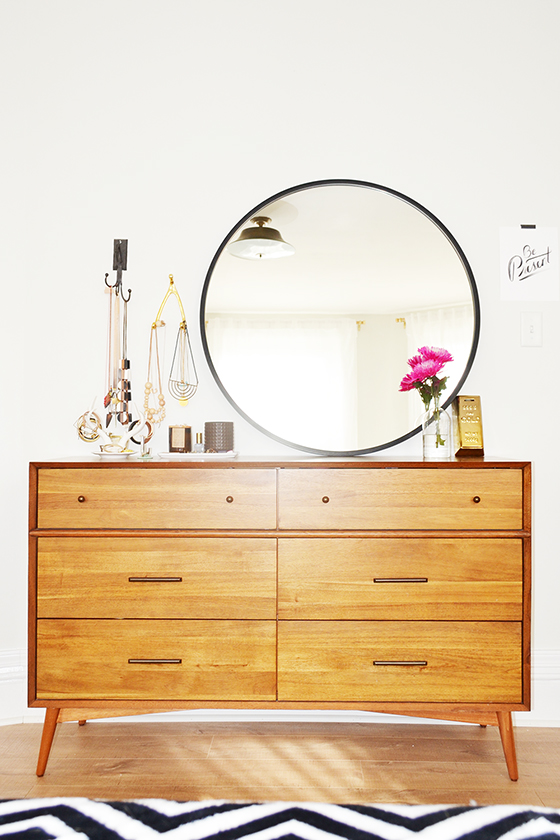
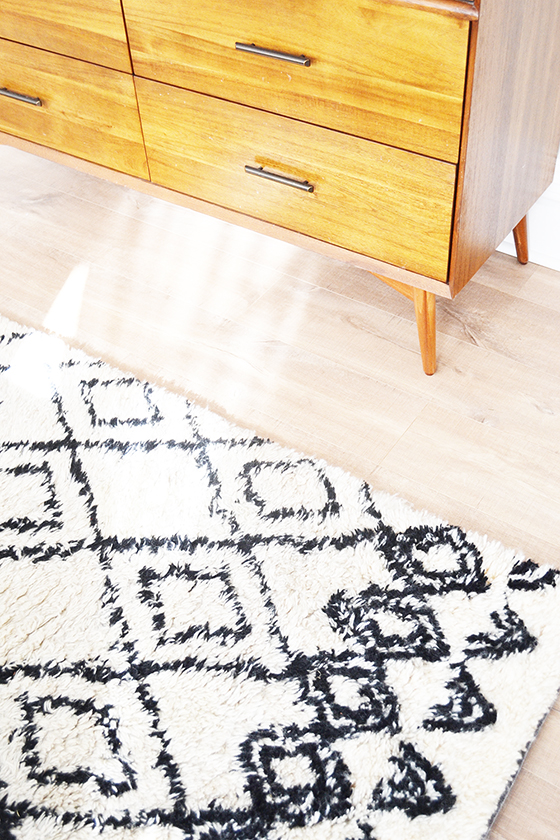
When it comes to dresser mirrors I’m more of a leaner than a hanger. I finally upgraded the round vintage mirror that sadly cracked in half and that I sadly kept using for more than two years with a larger 36-inch one, the HUB Mirror. It’s rubber rim fits snuggly against my mid-century 6-drawer dresser‘s surface, leaving me unafraid of a crash in the middle of the night. You can’t beat the price of this piece either – it’s huge and quite a deal when compared to other large mirrors.
I’ve been on the lookout for a great floor mirror for years, and that’s not an exaggeration. The Payne antique gold full length floor mirror* got my number and called the next day. Its windowpane style has an art deco feel to it, and the gold calls out some of the other metallic accents in the room. I made space in my mini gallery wall for it, because it really does feel like a piece of art.
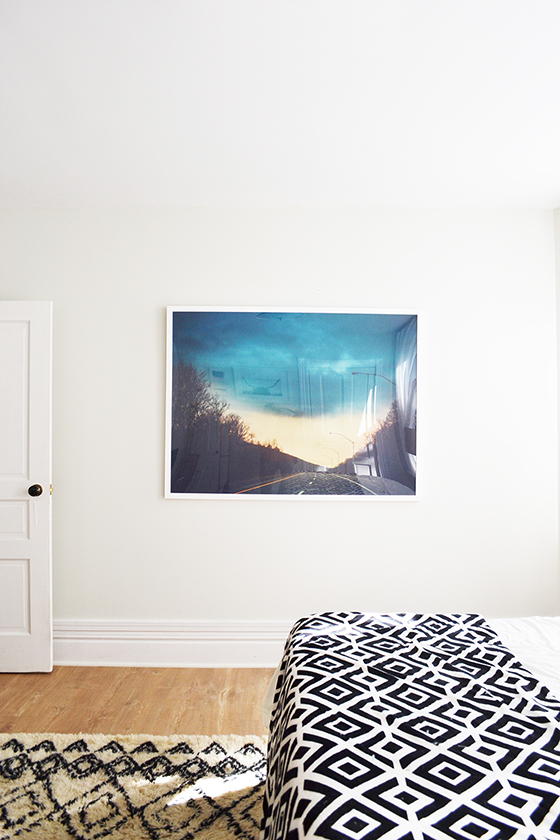
Speaking of art, my very good friend who is also a very talented artist – Jaime Derringer – made me four pieces of 4 x 4″ art for the revamped space. I have a few more things I’d like to do in this bedroom (new light fixture, different floor rug, adding a bench, etc) and framing these is at the top of the list. I love her abstract style and am thrilled to add these minis to my ever-growing collection of her work.
This piece, Stormy Drive, used to be a huge statement over my headboard. After relocating the bed to under the windows, I chose to lower the gigantic frame to be level with the door and let it own the entire wall. It’s so striking from this angle!
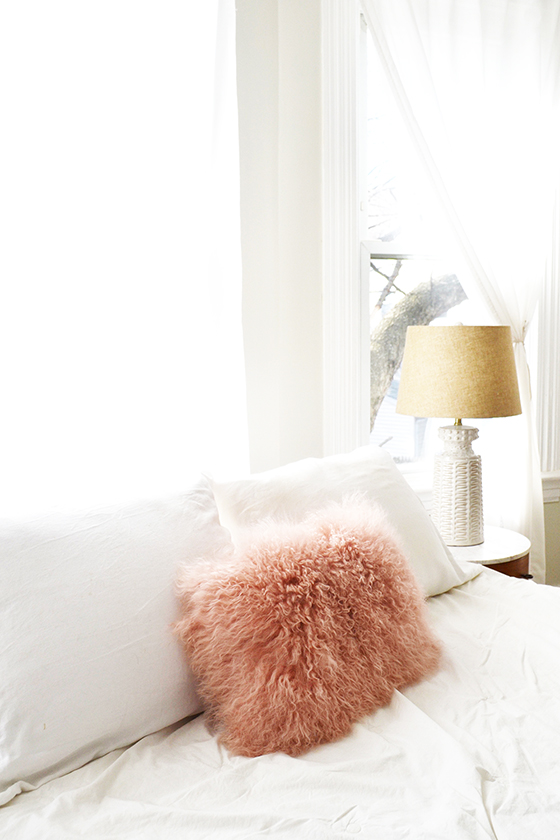
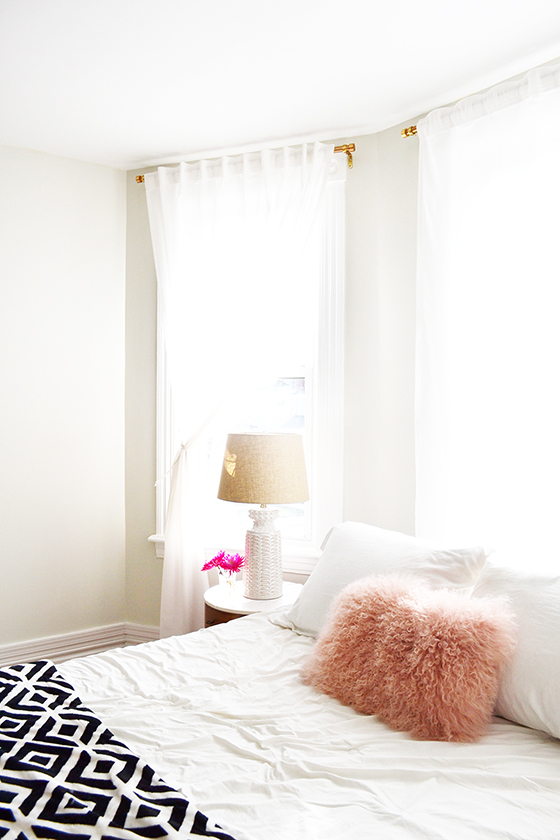
I’ve been toying with notion of painting this room the same pale pink as the accent wall in my office, and to ease into the idea I added this Mongolian pink fur pillow* to the mix on my bed. The texture is fantastic and I’m so much closer to pulling the trigger on that paint job.
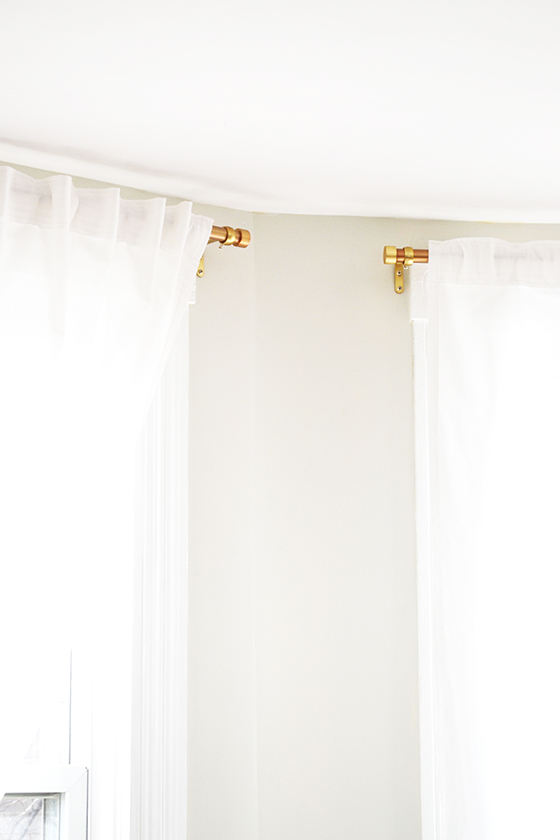
There’s only about twenty feet between my house and the neighbors’. So when I first moved in I picked up some tension rods to get curtain up ASAP and, well, never replaced them. This trio of brass Cappa adjustable single curtain rods look at least one hundred times better. At least.
The vintage light fixture fit in much better once I removed the ornate decorative rims – dare I say it looks modern even? It ties the curtain rods, the fixtures on the dresser and nightstands, and the edging on the floor mirror together oh so nicely.
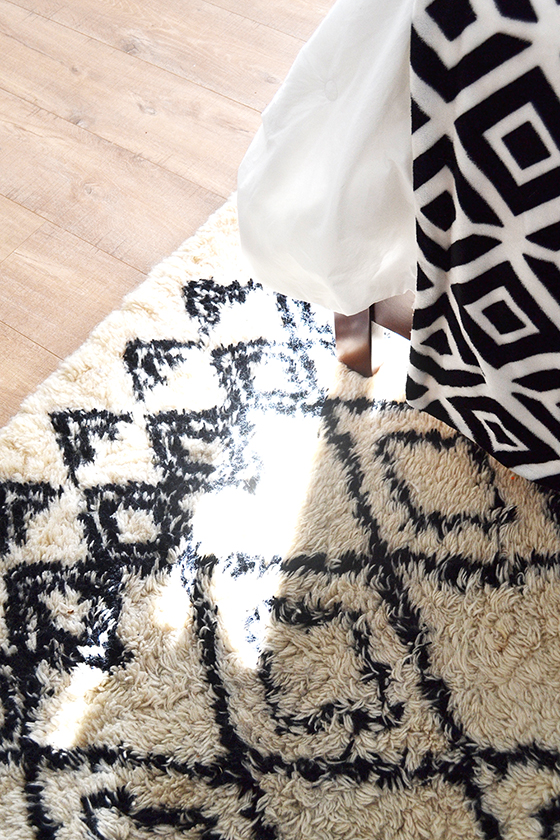
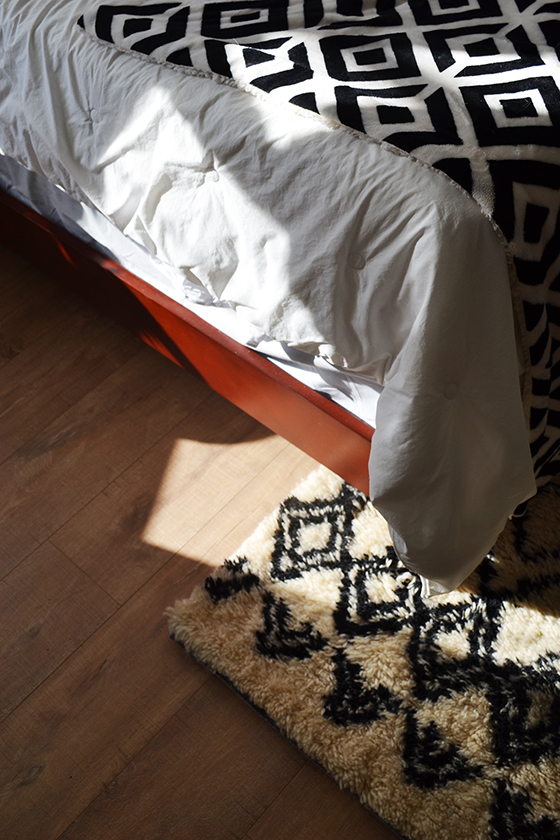
The last addition is the Murray modern mahogany platform bed*. I was honestly pretty nervous about mixing mahogany with the other two wood finishes in the room, but it fits in seamlessly and actually manages to set off the Quick•Step flooring. I love having such a low-profile bed more than I expected I would, it just helps the room feel that much more open and airy which was my number one goal in this project.
If you ignored me above, click over to Quick•Step Style to read more about the transformation and process, the amazing flooring, and five tips for making your space feel bigger. And then enter the RoomUP Sweepstakes for a chance to win up to 500 sq ft of Quick•Step flooring for your own project, as well as see other transformations from other RoomUP bloggers!
This post sponsored by Quick•Step. All words and opinions are my own, as always. Thank you for supporting the brands that help keep Design Crush creating fresh content! Get more inspiration from Quick•Step on Facebook and Pinterest. You can also download their Style My Floor app to visualize their floors in your own home. *product provided by Lamps Plus
If you asked what my biggest interior design pet peeve is it wouldn’t be ceiling fans, it would be wall to wall carpeting. I despise the stuff with the fire of a thousand suns, which of course means it’s covering the majority of the floor on the second level of my house. So when Quick•Step flooring reached out to me about participating in their RoomUp Blogger Challenge it was a no brainer to say (and not scream) yes!
Aside from flat-out not liking wall to wall carpeting, most rooms upstairs weren’t an issue. The guest room door stays closed, the bonus room stays relatively pet-free, the bathroom is tiled, and my small office was floored with the leftover laminate from downstairs. But the master bedroom is a different story altogether, because that’s where my two elderly cats spend most of their day and I’ll say no more about it than that. The carpeting either had to be replaced (no!) or new flooring put down.
I requested four different flooring samples from Quick•Step‘s extensive collection, and once they arrived let the pieces sit on the floor in my bedroom for a few days before making a final decision. Pop over to Quick•Step Style to read more about which option I went with and to see more transformations from other bloggers participating in the RoomUP Challenge! I’m looking forward to revealing my full bedroom makeover with you next, and you can see a little sneak peek below.
I truly love this product and would love for you to love it, too. So make sure to enter the RoomUP Sweepstakes for a chance to win up to 500 sq ft of Quick•Step flooring to transform a space of your own!
This post sponsored by Quick•Step. All words and opinions are my own, as always. Thank you for supporting the brands that help keep Design Crush creating fresh content! Get more inspiration from Quick•Step on Facebook and Pinterest. You can also download their Style My Floor app to visualize their floors in your own home.